
Just like setting up your bike, you can set up your app easily with this step-by-step guide.
Click on the images to enlarge them.
Download the Ampler app
- for iOS (from iOS 14 onwards) from App store

- for Android (from Android 7 onwards) from Play Store

The App is available for iOS from iOS 14 onwards and for Android from Android 7 onwards, since these still receive security updates. Our app is not available on other platforms.
 | Once you download the new app, your options to register depend on your phone's operating system. If you are using an iPhone, the app will ask you to register with your Apple ID or phone number. On Android, you can use your Google e-mail oryour phone number. You should always log in with the same account and choose either e-mail or phone number, otherwise you will not see reliable statistics and will encounter issues with a later authorisation. Always use the same account and the same login method. |
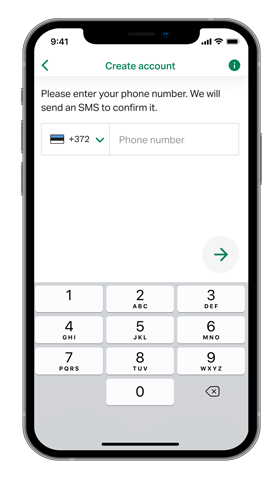 | If you decided to log in via phone number, a code will be sent to you via SMS, after which you are able to log in. Note that you might not receive the SMS or that costs may apply when you are travelling. |
 | Open the app again and hold the phone close to the power button. The search dialogue appears, and you should be able to find and select your bike. |
 | On Android, you are asked to pair and connect. Proceed. Sometimes this dialogue appears twice. |
 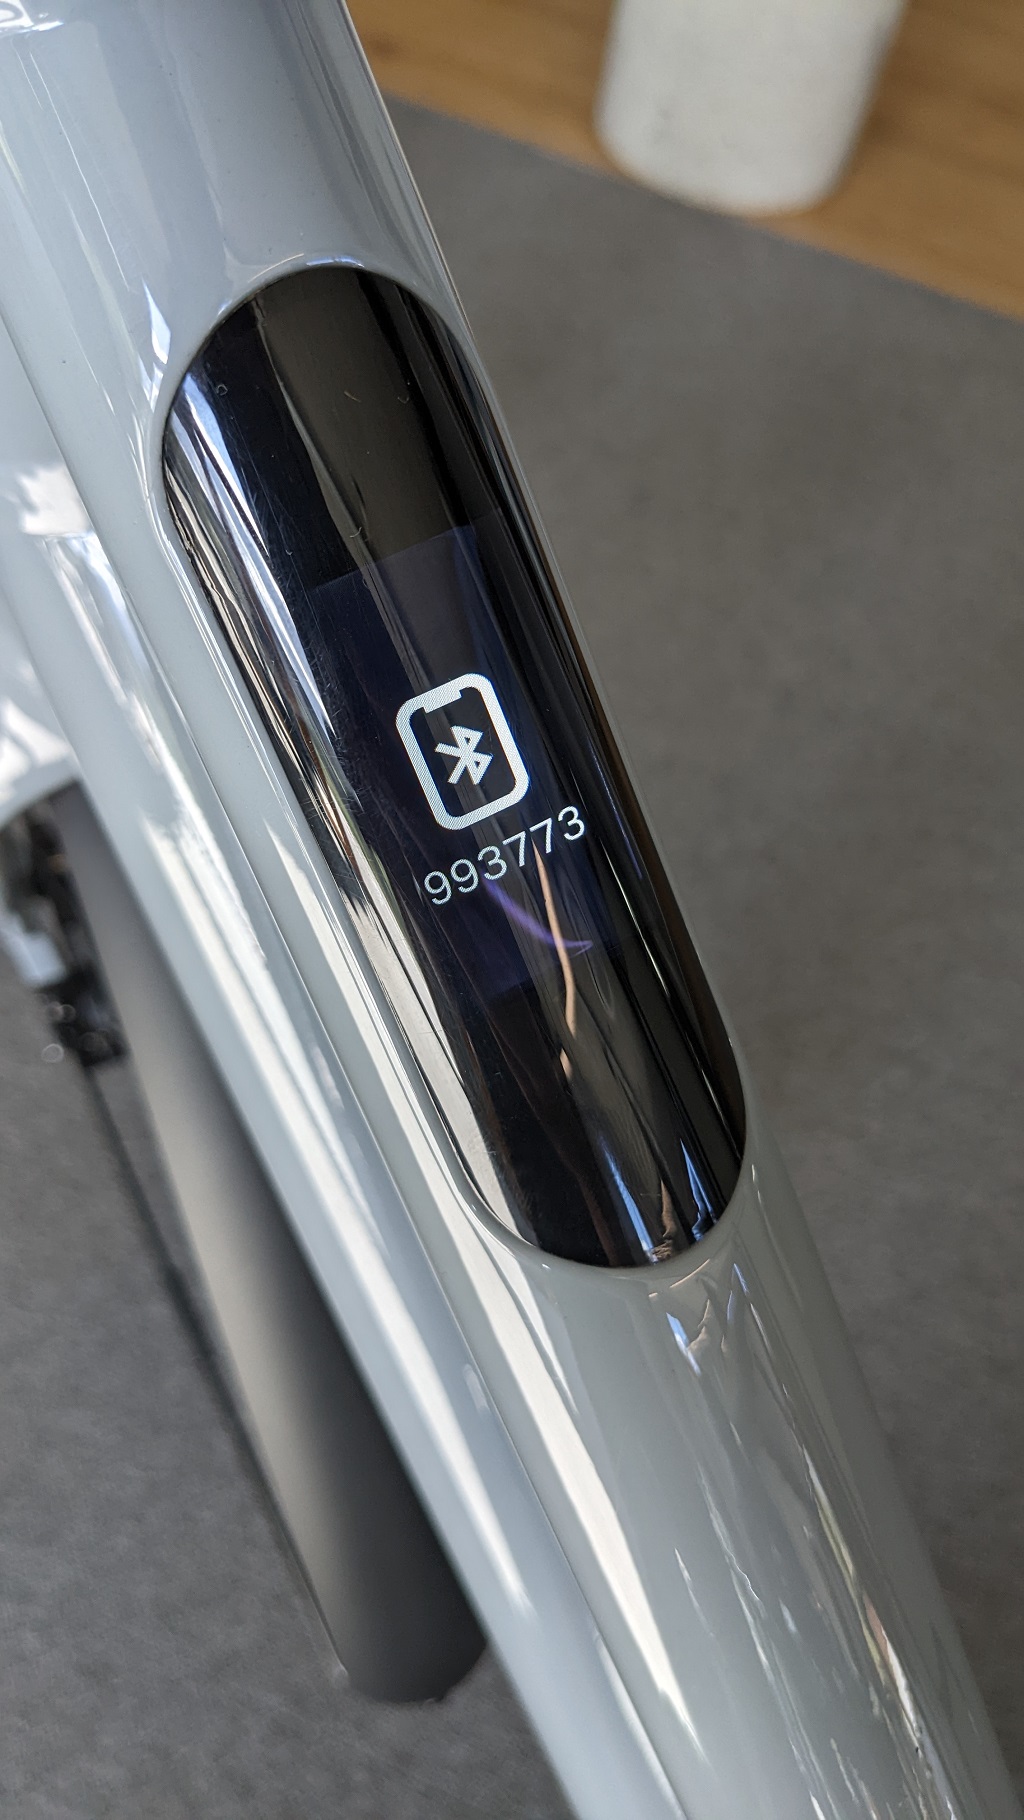 | On Generation 2 models, you will now be prompted to enter a code, this is the code shown in the bike's display. Enter the code into your phone as you see it on the bike's display. |
If you are having problems connecting via Bluetooth, please follow this troubleshooting guide.
For Generation 2 models, authorising makes using location services and other security features possible in the first place. Read more about the overall function and benefits of authorising, also for your Generation 1 model. It is mandatory for Generation 2 models and optional for Generation 1 models.
After connecting the app to your bike for the first time, you should be prompted to enter your order number. This is NOT your frame number, but the number which is noted on your invoice and displayed in the order e-mails: order confirmation, payment confirmation, shipment confirmation etc.
 |  |
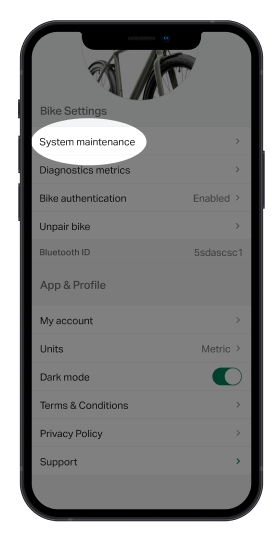
Disabling authorisation or location services
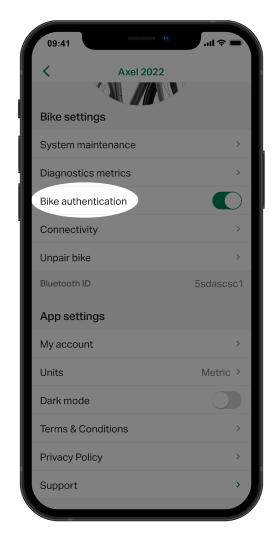 | You can always turn off authorisation through the app settings menu. For Generation 1: Note that it also removes authorisation for all other users as well. For Generation 2 riders, it will make the app unusable since the authorisation is tied to location services and other security features. |
 | As Generation 2 rider, if you want to use the app but do not want to use location services, you can turn them off via the settings menu under “Connectivity”. This will disable bike tracking, movement alerts, remote bike status updates, automatic over the air firmware updates and remote diagnostics. |
Locking the power button
Through the Ampler Bike app, the power button can be blocked from unauthorised use. All bike functions are disabled until the owner unlocks it.
 |
|
The strength of the motor support can be regulated in two support modes, but, thanks to our torque sensor, is always based on your input on the pedals. There is no need to switch between those two support modes during your ride.
You can switch between both modes through the power button or the app – read more on how to switch modes in the app below.
Danger
While riding, do not switch modes, make adjustments in the app, or use the power button.
 | To switch between modes on your smartphone, connect the Ampler app with your bike and tap on the icon on the bottom right of your screen. |
 | You can switch between "Default" (assist level 70%) and “Max” (assist level 100%). You can also switch the motor assist off. This only switches off the motor support, but has no impact on your lighting settings.“Default” |
 | To individually adjust the modes, tap the control icon next to the mode you want to change. |
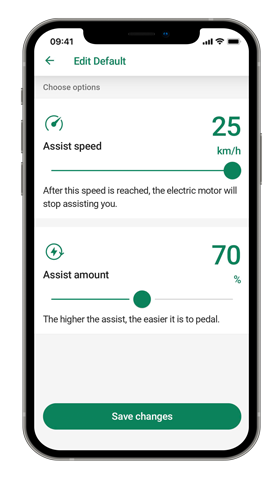 | You can now set your maximum assist speed and configure the assist amount. At a lower assist speed, the motor gradually stops supporting at your set speed. The assist amount regulates the push from the motor, depending on your pedal input. Lowering these values can prolong your battery range. |
On Generation 2 bikes, statistics are uploaded by the bike once it has an internet (GSM) connection. Read more about this in the next step below - 7. Location and alerts (Gen2).
On Generation 1 bikes, statistics are uploaded via the Bike, to your phone's Bluetooth connection and into the app.
 | You can see the total kilometres you rode on your Ampler on the app dashboard underneath the top scale. |
 | To get a better insight, tap the activity icon on the top right of your dashboard. The location of this button may change depending on the Generation of your bike. |
 | Have a look at your data from the current week. The bike also counts your kilometres if you don't actively use the app. By tapping “Statistics”, you can have an even more in-depth overview of your monthly and all-time statistics. |
 | The activity data in our app is stored in our own database and can be recalled on any device you install the app on and pair your bike with, given you are using the same account.
|
If the bike has no internet connection, the update cannot be uploaded, but it will try to do so once a connection is found.
For the location to be reliably displayed, the bike has to have a GPS connection. It will always upload the last known location.
The frequency of the update depends on whether the bike is switched on – and if not, whether there is any “interaction” with the bike. Read more about the frequency of uploads here.
 | On Generation 2 bikes, the app has two "views". One is the Dashboard view with the speed, range, power, and possibilities to lock the power button, switch modes and lights on and off. You are only receiving current data on the Dashboard, if your bike is connected via Bluetooth. To switch to Map view, tap the pin symbol on the top left. It does not matter if your bike is connected to Bluetooth or not to acces this. |
 | This is the Map view, where you can see the location of your bike, as well as statuses such as remaining range, state of charge, and assist mode. |
 | If it's actively charging, this view will also show the remaining charging time. If the bike is locked, you will see a lock-symbol. |
 | Locking the button via the app enables movement alerts. When the bike is parked, the button locked and someone moves the bike, you will receive a push notification on your phone. Make sure you have notifications enabled for the Ampler app. |
 | To switch back to Dashboard view, press the X-icon on the top right. |
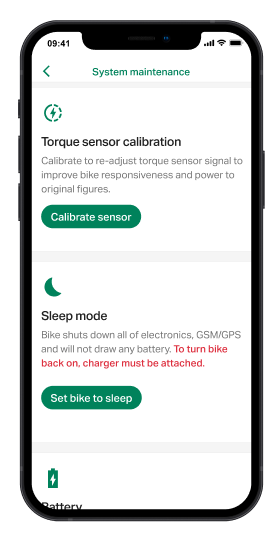
- Torque sensor calibration
During the torque sensor calibration, the bike's torque sensor is adjusted and the functionality of all electronic components is calibrated with each other. We recommend calibrating your bike’s torque sensor every 3-6 months, or in case the bike feels over- or underpowered. It can only be done via the app. Read more here. - Firmware restart
A firmware restart resets the settings of the bike and restarts the electrical system support. It can be done via the app or button. Read more here.
It can be helpful to correct the following problems:- Minor faults or deviations in the behaviour of the bike.
- Problems with the power button.
- Communication issues between Ampler Bike App and bike.
- Factory calibration
The factory calibration can only be activated by our customer service and is then available only via the app. With the factory calibration, all sensors of your e-bike are adjusted and the functionality of all electronic components is synchronised with each other. It is not intended as a regular maintenance procedure and also resets the motor settings in the app. Read more here. - Battery Shutdown/Sleep mode You can perform this via the app or button. Once you put your bike into sleep mode, you can only turn it on again with an Ampler charger under current. Read more here.
Putting the bike to sleep has two functions.- Storage purposes: It puts your Generation 2 bike to “sleep”. Shutting down the battery means all electronic functions will be off. We recommend putting the bike into sleep mode if you don't intend to use it for more than two weeks.
- Troubleshooting purposes: Since it simulates a disconnect between battery and bike electronics, it can help “jumpstart” the connectivity functions, when the GPS/GSM modem is not acting as intended.